Some 25 years ago, I experimented with what I back then referred to as "linked flies". Today they’d be called articulated, and I have taken the tying method up again.

Old articles here on the Global FlyFisher don’t die easily, and even the very first thing ever published on the site – way before it even was the Global FlyFisher – is still around, now getting ready to celebrate its 28th birthday.
Another piece that has had a long life is this article with the title "Linked flies", which was published in the spring 1996, after I had been experimenting a bit with some extended tails on my usual coastal flies, and had had some fun – and some fish – when tying and fishing them.
Ur-shanks
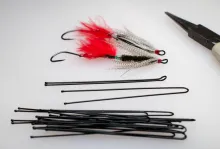
They were essentially what’s now called articulated. I simply bent some thin, soft wire to form an open ended shank with an eye in one end. This was the foundation for the tail section and was connected to a loop made from thick mono tied to the hook after having been threaded through the shank.
In other words an articulated fly using a single shank.
This was way before that term was coined, and before commercial shanks were available in numerous shapes and sizes. This was an era where you could find articulation in flies, but mostly in the form of Wadington shanks for salmon flies, and flies like Hugh Falkus’ Sea Trout or Sunk Lure and some US NE streamers where two hooks were connected with a piece of line or wire. The Intruder style, in a sense also featuring articulation, probably saw the light of day around the same time as my first links, but differ because they have a trailing and mostly undressed hook connected to the front shank with a wire loop, and aren’t articulated as such.


No rear hook
My flies did not have a hook on the trailing section, but just used the rear shank as a means to extend and articulate the tail. The advantage of not having a trailing hook is much less strain on the link, but the disadvantage is of course that there’s no hook in the rear of the fly, potentially reducing the chance of hooking a fish that bites the tail of the fly.
My personal experience with these “short strikes” is that the risk of not hooking the fish is vastly exaggerated. People have fished with very long flies with short front hooks for ages, and the design obviously works. Fish seem to be able to grab these long flies just fine in a way that easily connects them to the hook.
I have fished all kinds of long winged streamers and zonkers and never worried about fish “nibbling the tail of the fly” as some fly anglers express it. Most hunting fish tend to engulf the whole prey using the vacuum created when they open their mouths, and many fish will even attack their prey from the side, also minimizing the risk of missing the mid- or front-mounted hook.
My own experience with my first linked flies was that fish were hooked just fine, and that these fairly short flies didn’t decrease my hooking rate. The problem wasn’t getting the fish to take the fly or hooking them, but – as always in my fishing for sea trout – simply finding the fish.
A passing fad
Back then I may have used these flies on and off for a season or so, but soon abandoned the concept. They were fun to tie and looked great – both in and out of the water – but honestly, they didn’t do much that their non-articulated brethren couldn’t do. So spending the extra time on making the shanks and tying the flies didn’t really seem worth it, and I soon returned to my trusty single hook sea trout flies, which worked just fine with way less work at the vise.


A set of pliers
Some time back I bought a set of looper pliers. I had long been fascinated by this tool, and having tied quite a lot of Intruders, I wanted to experiment with making my own shanks. This worked just fine, and I started producing Intruder shanks in many sizes and shapes from many different materials. All the bending and cutting led my memory back to the old linked flies, and I got out some thin and soft wire and started experimenting again.
The shanks are really easy to make using the tool, and turn out very nice and consistent. I currently use two shanks for each fly, tying a shank to the hook rather than a mono loop. The wire is thin and light, and the metal shank and eye is easier to control than the springy loop made from heavy monofilament. I could also use braided fishing line or even intruder line on the hook, like I do on the shank in my intruders, but the bent wire shanks work just fine.

Small and light
I make the shanks of some jewelry wire that I picked up in a craft sore. It’s durable enough, a bit on the soft side, but has the advantage of not rusting immediately when exposed to saltwater.
Real stainless wire would probably be better, but is very stiff and much more cumbersome to bend into shape. You can look around for a suitable wire, and check out spinner wire for lure building or trace wire for saltwater fishing, often available in coils or straight pieces for sale at fairly low prices. It needs to be about 0.5-0.75 millimeters in diameter or somewhere around 0.020-0.030 inches.
I snap off a bit about 2-2.5 centimeters or an inch long, and bend it in the middle, forming a narrow and tall V or U. I put the bend over the peg in the pliers and crimp the wire while holding the tag ends flat and parallel with my fingers. You can see the process shown in the video in the end of this article.
It’s important to bend the wire before making the loop, because the way the pliers usually work, they will make a very nice eye on the wire, but also cut off one leg of the shank, and the wire isn’t stiff enough to keep this eye closed when under stress. The two legs ensure that there’s a solid connection between the front and the rear shank.
Once bent, I trim the rear shank to about 1 centimeter or 1/3” in length. The front shank is trimmed to a little shorter than the hook shank it’s going to be tied on to.
Tying and mounting the tail
I mount the rear shank in the vise by grabbing the two legs and having the eye pointing out. This enables me to tie a tail the way I’d tie a fly on a short hook.
When the tail is done I make a small “head” on it, whip finish and varnish. When it’s dry, it’s ready to be mounted on the hook.
I open the front shank a bit and thread one leg through the eye of the tail. I can now mount a hook in the vise and start the thread on the shank. I lay down the front shank of the tail assembly on the top of the shank and secure it well with tight wraps. I usually don’t varnish or glue, but if you want extra strength here, feel free to add a substance of your choice.
I’m now ready to tie the rest of the fly on the hook – like any other fly.
Martin Joergensen
Patterns
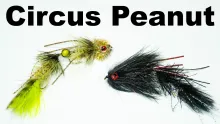
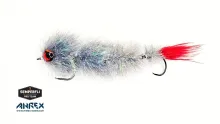
I have extrapolated this idea and improvised and adapted several patterns to the style. I have recreated some of my 25 year old flies, but also used the technique to tie some fairly large flies, probably well suited for stream fishing for salmon, sea trout and steelhead.
The style is of course also suited for large trout streamers and flies for pike and muskie where the added size with little added weight can be an advantage.


- Log in to post comments