
Epoxy is out! Hotmelt glue is in! When it comes to tying eggs and MOE blanks, this stuff is the new hot way to do it! Let our own Mad Scientist teach you more...

Aided by The Mad Scientist
With the introduction of the first MOE bonefish fly many years ago, epoxies, silicones and other glues have been a strong part of the fly tyers arsenal. One adhesive material that has been overlooked has been the use of hot melt adhesives in fly construction. Why overlooked?, I don't know. The use of hot-melt glues in making flies is simple, efficient, fast and cost effective. Glue guns and hot-melt glue sticks are all you need.
One fear or concern is the ability of the glue to withstand direct sunlight causing the glue to melt. In the many years of using hot glue I have never heard one complaint about melting in the sun. Many of the hot melt adhesives need a temperature of 300 degrees or better to melt down and just keeping it out of direct sunlight in hot weather for any length of time does the trick.
Hot melt glues are available in many colors and in pearlescent colors as well. Store-bought colors have one slight problem: they come in green, red, yellow and etc.. in completely solid opaqueness. These are not considered "fishy' colors and many patterns call for clear or transparent. I have searced for a number of years and through experimentation (it is never ending) I have found some hot-melt glue in colors and appearance that fly tyers will like.
There is nothing unique about the use of these glues. No special glue gun or equipment is needed. A standard hardware glue gun with a high temp rating which takes standard size sticks, a bowl of cold water and some paper towels are all the equipment needed to make your own Hot Glue flies. The sticks are standard size, 1/2" diameter and 4" in length. A standard stick will tie over 4 doz. #8 single eggs!
There have been a few articles and a section or two on hot glue usage and one in particular was by a famous fly fisherman on saltwater patterns that was completely 180 degrees out of balance. You do not need a turner; you do not need a vise to rotate the fly or use one when applying the glue nor do you need molds or anything remotely like that. Your hands will do the best job just by turning the hook. Let's explore the basic factors, and they are very basic, when using hot glue.
If you stick to these you will eliminate a lot of initial frustration and problems.
- When applying the hot glue make sure the gun you purchase has a smooth trigger action and not one that "clicks" when squeezing the trigger. The click will push too much glue out of the nozzle and then you have a complete mess; it gets hot when dripping on your leg!
- Next make sure that only a small bead is coming out from the nozzle of the gun at one time and in a continuous amount when putting glue on the fly. This small amount allows you to PUSH the glue into place with total control of the glue. Always use a little at a time and add more when needed and PUSH the glue with the nozzle of the gun putting the glue into its exact location. A little is good a lot is worse!
- When squeezing glue onto your fly keep the nozzle of the gun close. Almost on the fly to eliminate dripping and having too much glue for that pattern. Take the nozzle away from the fly when you have finished squeezing glue onto that particular spot. Pull and twist the gun in small circles counter clockwise or clockwise to rid some glue threads that happen when you pull the nozzle away. Then you can place the nozzle into another position and start applying glue again or place the gun down. These little circular motions eliminate glue drag away from the fly.
- Hold the hook or fly in your hands when you are prepared to start using the hot glue. Holding it the hands gives you complete control over the positioning of the glue. Gravity becomes your best friend at this point. Holding the hook allows you to twist, turn, rotate and etc., the fly to position the glue where you want it by use of gravity. Most of the time this takes only a few seconds. Keeping it in a vise disallows this freedom.
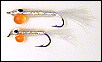
The Single Egg
- Use any standard egg hook or hook period. Hold the hook bottom as you would any fly so hook is in upright position. Rotate hook toward you, shank is nearest you, and place nozzle of the glue gun on the top or side of the hook.
- Slowly squeeze a small bead of glue on the side and lowly rotate the hook away from you while continuing with the bead of glue being applied to the hook. Stop when you have turned the hook 180 degrees.
- Then, using the nozzle of the gun DRAG the glue around the rest of the shank of the hook using a circular motion and circle the hook a couple of times barely dragging the glue. You can then squeeze more if needed on ONE side of the hook and twist the gun away. Rotate the hook in your hands up down and around to position the glue into a perfectly round egg.
- Once your are satisfied with the shape quickly immerse the whole egg into a cold bowl of water. This sets the outside of the glue so it will harden and sets the shape. Dipping the hot glue into cold water also makes the glue very clear. Air-drying only makes the glue cloudier. Count to 7 and then take egg out of the water and lay down on a piece of paper towel. Let sit for 30 sec. It's done!
The single hotmelt glue egg is one of the simplest flies to "tie".
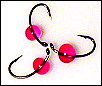
Make an Egg Cluster: To make an egg cluster you do virtually the same as a single egg, but in this case put the initial egg near the eye of the hook. Make the first egg and let harden. Before you make another egg on the same hook you MUST get rid of all water that the HOT glue will come in contact with. The water will make the next egg bubble when the HOT glue meets the cold water. Once the water is absent, place another egg behind the first leaving a little distance of bare hook OR you can put a ball of glue halfway on the first egg and on the hook on the side of the hook just behind the first egg. Just squeeze a ball into one spot and let harden. Then add another ball on the other side and harden and a fourth on top of all three eggs. Each egg touches the other to harden with each other. If you put one egg near the eye around the hook and another behind around the hook then add two more eggs. One on one side halfway on top and the other on the other side exactly the same way. You have a four-egg cluster. Bigger hooks equal more eggs per cluster!

The Egg Cluster is easy to form on the hook.
Simple Hot Glue Baitfish
| Hook | Streamer hook |
| Thread | White flat waxed nylon |
| Tail | White/Natural Crystal Web (Krystal flash also) |
| Body | Pearl Mylar Braid Back: Black HoloGraphic High Voltage (Flashabou also) |
| Overbody | Clear Hot Head Glue Add some orange or pink for an eggsac. |
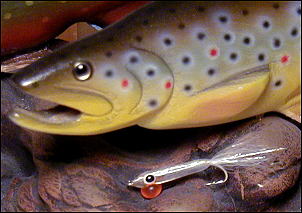
Tying the Simple Baitfish
Tie in the tail using Crystal Web Flash and extending about 3/4 shank past end of hook and ragged cut. Tie in Black Holographic High Voltage using about 5 to 7 strands on top of the body. Next tie in Pearl Mylar Braid and wrap braid to behind eye and tie off. Pull black holographic material over the top of the entire body and tie off. This is the basic baitfish body. Once this is done take the fly from vise and hold in hand ready to apply hot glue. Turn the hook exactly like you would with a single egg. Take nozzle of glue gun and start a small bead at the BACK of the fly near the tail and slowly squeeze a small bead out as you pull the nozzle up the length of the fly. Make a continuous line of glue. Repeat this process until the fly is covered in this manner. The final amount may have to be applied from the side, as your arm will not bend enough. You can then pull and twist the gun away and check for uneven and empty spots. Fill in spots with glue and use the nozzle to push into place making the forward or head of the fly either slightly thicker or thinner. Rotate fly to position glue into place using gravity. Once you are satisfied with the shape dip in cold water and count to 12 or so and then place on paper towel.
Once the fly is dry you can add an egg sack underneath the fly by just squeezing out a ball of glue on the underside of the baitfish. Dip in cold water and let sit. Paint eyes as the last step. This is a very fast and easy pattern to produce.
Hotmelt glue makes realistic-looking fry patterns.
MOE
Make a MOE (Mother of Epoxy) Head: Use a #4 3407 Mustad hook. Tie on a set of medium size bead chain about 1-1/2 eye length behind the eye of the hook on top of the shank and tie off. Next, take the hook out of the vise and hold in your hand. In this style, start behind the bead chain head holding the hook upright and NOT rotating away with the small ball of glue and then slowly drag and squeeze more glue as you go forward around the eyes to exactly behind the eye of the hook. Stop and then do the other side the same way. I rotate the hook having the eye of the hook facing me directly but still upright. Basically, you have made an outline with the glue for the head shape. Once this is done then turn the hook upside down and fill in the bottom with glue. DO NOT use too much, use the nozzle to push into any gaps and into place. Then turn the hook upright and do the same for the top. Check the sides and see if they are even in proportion. If they are not use the nozzle ONLY to reshape the sides. Use gravity to position the glue and dip in cold water. Tie on whatever you wish or tie on materials first and make
the head last. Placement of the eyes farther back will give you enough room to make a Charlie style fly to tie materials in as a throat. Fast and easy!
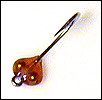
The MOE blank is the essential element of any bonefish fly. Using hotmelt glue makes quick work of creating your own MOE blanks.
Other patterns to consider
Create a Two-Tone Egg: An alternative is to first squeeze on a very small bead of another color glue on the hook. Once this hardens coat the small bead with another color using the procedure above and you have a Two Tone Egg.
Create a Gold Egg: Put a gold bead on the hook and tie down. Coat bead with hot glue.... Gold Bead Egg!
Make a Bead: Use a hook, thicker shank, cut off the eye. Make an egg in the middle of the shank like above. Let sit to harden for a minute or two. Then twist egg and pull off hook.... you have made your own bead!
Make an Egg-Sucking Leech: Your home-made bead can be pushed OVER the eye of a woolly bugger to create an Egg Sucking Leech, since the glue is soft and expands and contracts.
Place a bag of various colors and sizes of homemade beads in your fishing vest and put on any fly pattern at will... AND take them off just as easily.
I have given you a basic introduction into the world of using hot melt glue for fly patterns. The techniques are the same and only slightly modified. The basic factors mentioned above count for 90% of hot glue control. Crayfish, Frogs, Crabs, Ants, Stonefly Nymph Bodies, Caddis Pupa air bubble, Egg sucking Leech, Pinfish Jig Heads, Baitfish... you name the type, Bonefish MOEs, Own personal beads, eyes.
Using a sheet of glass and paint for the pupils... any size, color and shape! Glue Gun, Bowl with cold, Paper Towel and GLUE! I suggest for those who really get into the Hot Glue techniques is to pick up a gun for each color glue stick used. Once the stick is in the gun it is IN THE GUN! For those who use only a gun or two cut the stick in half or thirds and use a small amount for a small number of flies. This will stop a lot of waste. Guns can be purchased fairly inexpensively. Costs range form $10 to $25.00 ea. and sometimes cheaper on sale from your hardware stores. You can also get a dowel rod that will match the diameter of the glue stick and use it as a pusher so you do not have to use a whole stick. Just be careful of leaving the glue gun on with the pusher deep inside. as wood burns.
Enjoy!
- Log in to post comments
