
How to make a 10 dollar tying station based on a cheap IKEA cutting board.

I grew up in my grandad's farm in Puerto Rico. My family didn't have much money and as a child I learned to care and repair my toys rather than throw them away or replacing them with new ones.
I think that necessity helped me develop an "I can fix that" attitude that is as alive today as it was then. Now that I started tying my own flies, this "creativity" was awakened when looking at tying stations in the internet. I thought "why buy one when I can make my own"... and so, this project began.
why buy one when I can make my own
I started with a $10 cutting board from IKEA. I didn't want to spend too much on tools that would be used once, so again, decided to go with what I had (for the most part). I used a hole drill bit to cut 4 circles on the board.
Two would become wells for hooks, beads and other small items. The center 2 holes were to be united using a chisel to form an oval shaped well that would later become both a decorative accent as well as another place to put small items.


I purchased a $12 wood gouge to make the well bottoms concave. That took a lot of time and patience as I had never done such work before. As I continued to develop my board, I decided to carve a fish on the center well... I was going to carve more decorations but decided against that idea.
I then drilled the holes for the vise shaft and attached a nut using JB weld. I continued testing ideas, developing the small details of the carving and eventually sanding, protecting the board with many layers of clear polyurethane and polishing it to a glass smooth finish using car polishing compound and an orbital polisher. I filled the center well with clear 2-part resin to protect the carving and prevent small beads from getting wedged in the small crevices of the carving.


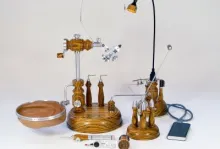
I added a tool holder made with a stick we found during a fishing trip. I drilled holes on the top (for the tools) and the bottom (for the 2 metal rods that attach to the board). To finish it off, I glued a rubber mat to the bottom to prevent it from slipping on the table.


A short video showing the IKEA Fly Tying Board
Hand picked for this article


- Log in to post comments
