
Make your own large eyes for pike and saltwater flies using inexpensive materials and a little time. Some adhesive marker dots, a handful of waterproof pens and some LCR and you can start your own stick-on eye factory.

When you tie big flies, you often want to put eyes on them. And big flies need big eyes.
Stick-on, 3D and doll's eyes are available in a massive number of types, sizes and colors, and when you start looking you will soon discover a very large selection.
I have a couple of problems with the finished eyes. Most aren't large enough for the biggest of flies like large pike streamers, and they are also pretty expensive, especially if you buy the 3D ones that have a bit of shape.
So why not make your own eyes? It's fairly simple: most eyes are simple: round with various concentric rings of color - maybe just a single round dot as a pupil, and since most eyes wind up under some kind of resin anyway, a 3D shape isn't that important.
OK, some of the factory-made eyes are really fancy with holographic print and naturally shaped pupils, which are often drop-shaped or non-circular. I like these eyes, but again: they tend to be expensive, and for pike flies, which are often shredded to pieces, something much simpler can do.

Cutting
The really simple way, which was where I started, is simply cutting out circles of some kind of material - paper, plastic, foil or whatever - and then using a black marker to create a pupil, and the eye is ready.
The problem with this method is cutting out the perfectly round and regular shape and getting consistent results.
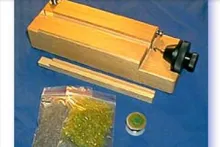
Using some kind of punching tool makes the task easier, and there's lots of different paper punches available in craft and stationary shops. They can punch out uniform shapes and can be found in many useful shapes and sizes ranging from tiny, like 1/16 of an inch or 2 millimeters, to large, 1/2 - 5/8 of an inch or 12-16 millimeters and even larger. If you want humongous eyes, punching tools can be had up to larger than an inch or 2.5 centimeters. Here's looking at you, kid!
With a suitable a tool you can mass produce small circular dots of almost any flat material. Some of the punchers even cut thin metal.
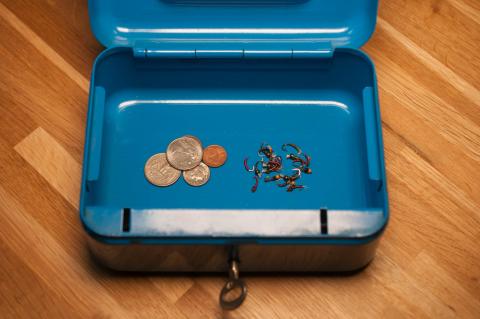
I have used different colors of paper as well as shiny and holographic foil used for spoons and other lures, which can be bought in large sheets for very little money. If you look for adhesive foils in hobby stores, the sheets are bigger and prices are even lower. More on that later.

Finished dots
A manufacturer such as Avery has a very large selection of adhesive paper dots. The dots are available from other brands too, but Avery is widely available, and the dots can be found in several sizes and colors, and you can buy bags both with mixed colors and single color dots.
Look around in stationary shops on and offline and you can find a large selection. If you widen your search and look for holographic stickers, you might be lucky and find some that are circles only and useful for eyes.
You can even buy packages with 7,000 paper dots at a time! These are 8 millimeters or one third of an inch in diameter, which is a bit on the small side for my use, and there are no white ones in the package, but at £7.- or 11 US$ for the package, it hardly gets any cheaper.
Small dots on large dots
The easiest way of creating an eye with a pupil is to stick a smaller dot on a large one. You can combine the colors, and even though a black dot on a white one might look most like an eye to you, remember that fish have very different eyes from humans and mammals, and color combinations that might seem strange, aren't all that strange when mounted on a baitfish imitation. Think of a roach with its predominantly yellow, orange and red retina or trout with amber and brownish eyes and black pupils.

Dots and markers
You can also use markers or pens to create the pupil. I have a large selection of very densely colored markers from the manufacturer Molotov. They are high quality and have very good coverage. These pens are favored by taggers and graffiti painters - a good credential, but on a somewhat shady background. Fact is that they cover very well, and even light colors on dark backgrounds will cover the background fully with just one layer.
You can of course also use paint. It's a little less convenient, but pretty easy. Use Bob Petti's stick method to create evenly round dots.
I simply dab a drop of pupil color onto the round dot label and leave it to dry. Once dry I cover the eyes with a thin layer of LCR and cure with UV to avoid smear. You can also use ordinary varnish on a brush or artist's fixer, which comes in spray cans.


Sheet foil
For foil you will need a punching tool or you can simply use a pair of scissors. Cutting by hand isn't easy unless you cut out larger circles. They have a tendency to become a little jagged and uneven. It doesn't matter much, but of course they look better if they are smooth and consistent.
The pupils can be made with dots, pens or paint like above.
I like to use some of the shiny or holographic foils that can be bought for spinners and spoons, and come in sheets. There are tonnes of colors and patterns.
You can also browse stationary stores for foils for book covers or paper or foils for other applications. These foils are available in different weights (thicknesses) and some have adhesive backsides, which can be an advantage, but isn't absolutely necessary. They often come in rolls at very low prices, and will give you raw material for thousands of eyes.
Covering the eyes
You can choose to leave the eyes as they are when they have been done. Once you stick them on the fly they will need to be covered with resin, varnish or epoxy anyway. The ones that have no adhesive will also need to be glued on using varnish, glue or resin.
I personally like to cover the home made eyes with LCR while they are still on the sheet. That adds a little 3D-effect, and makes it easier to handle the eyes without smearing anything and also makes them stiffer and easier to mount on the head using a dubbing needle or tweezers. Adding the bulging 3D-layer of resin is much easier to do while the stickers are still on their wax paper.
The end result is almost the same if you just coat the finished head, but as I said, I like the handling.
- Log in to post comments


I use a 1.00$hole pu
I use a 1.00$hole punch for tickets, I use iton plastic, paper etc the hole punch makes a perfect eye.
I've used Corel Draw
I've used Corel Draw and Corel Paint to make some eyes. You can print them into any color combination you want, then punch them out into whatever size punch you are using. They come out of the printer dry. I've also used Corel Draw to elongate the center of the eye so that it's not circular. Then finish with Loons UV resin. I've been successful using a thin self adhesive sheet to print on. A little artistic flavor doesn't hurt either. Good luck with your creative endeavor.
Cool idea about the
Cool idea about the coffee seal! I'll remember that one, and have the wife save the next one.
One additional item
One additional item that can be used to make eyes...
The flavor seal on what used to be three pound coffee container are a bright silver color.
Cut or punched, they can be used with the system as explained in this article.
You can also use win
You can also use window colour to make eyes.