In my article The March Brown legacy I dived into the history and legacy of the classic pattern the March Brown. Originally tied as a wet and dry fly centuries ago, this very universal pattern has had a firm grip on many fly anglers and fly tyers, and has been responsible for catching literally countless fish. The fly has been used to target all kinds of fish, and hasn't only been used as an imitation of the March Browns, the very early mayflies found in streams all over the world. I know that the fly has been used more o less unmodified for sea run brown trout in the Danish coastal waters, and there are many accounts of a fly very true to the original pattern taking salmon - the fly tied on a salmon hook in slightly larger sizes than the traditional wet fly.
I truly like the colors, style and materials of the March Brown, and from never having tied one in my life, I went on to tying so many that it could rightfully be called an obsession. I decided to explore the possibilities, and see what could come from partridge, hare's wool and yellow rib. A lot, it appears!
I started out by tying a lot of classic wet flies, all using the March Brown materials, and all using the classic wet fly template: fairly thin tail, ribbed body, throat hackle and a feather wing. I extemporized a bit over that theme, using various wing styles, and even using other wings than the classic strip wing, like a wing of bunched hackle fibers and a wing brushed together from different strips of feathers from rooster, golden pheasant, partridge and more. From there on, I went overboard!
My first variation was a spey fly. Then a tube fly. Then a Bonefish fly! And from there I just cast overboard all modesty and went amok.
Below you will find a handful of March Brown variations, of which none have seen water, but of which I'm sure all could catch fish. If nothing else, these flies might inspire others to venture into the world of the fascinating March Brown. They appear in no particular order other than the sequence I tied them in... so no system at all.
A lot of March Browns Martin Joergensen
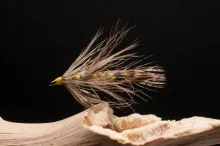
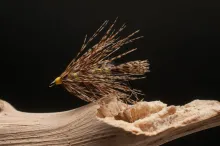
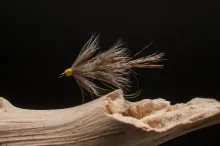
March Brown Wet
This is the classic March Brown as I conceptualize it. I realize that some older March Browns were tied in a very different manner, with the wings much more perpendicular to the body, but I still choose to call this the "classic style". The fly is a killer fishing fly, which can be fished as a wet fly "on the swing" - down and across and stripped in - or as an emerger, simply drifting it and maybe inducing some movement by lifting the rod to let the fly rise to the surface like an actual emerger.
Brown Wet
Martin Joergensen
March Brown Wet
The classical interpretation of the March Brown, with a swept back feather wing. The fly can be varied quite a bit within the scope: Red, tan, burgundy or yellow tying thread giving a different color head. Gold or silver ribbing - or some other color of your choice. Various feathers for the wing.
Fly pattern, materials and tying steps
Wet fly
cutthroat
grayling
Materials
Hook
Down eye wet fly hook, like the Ahrex NS115, #8
Thread
Black, 8/0
Tail
Mottled partridge fibers
Rib
Thin yellow floss or doubled tying thread
Body
Hare's wool dubbing
Throat hackle
Partridge breast feather
Wing
Strips of turkey, golden peasant or other suitable brown/white feathers
Head
Tying thread
Tie in the thread in the front of the hook shank.
Prepare a small bunch of partridge tail covert barbs for the tail. 10-15 barbs is enough.
Align the tips according to taste.
Trim the butts so that the full length of the bunch is about two shank lengths.
Tie in in the front of the shank and cover with thread to the hook bend. The tail should stick out about one shank length.
Tie in the rib. Use thin floss or doubled tying thread.
Dub the hook shank sparsely, leaving room for hackle, wing and head.
Rib the body in 4-5 open turns.
Tie down rib and cut surplus.
Prepare a partridge breast feather for the hackle by stripping off the soft barbs, leaving the stem.
Stroke back most fibers.
Tie it in tip first, curved side forward.
Wrap 2-3 times, stroking back and down the barbs.
Hold the barbs under the shank and cover the tie in spot to form a throat hackle.
Trim off stem.
Prepare two strips for the wing. 15-20 barbs in each strip is suitable.
Make sure each strip is flat and firmly married.
Hold them together, shiny side out and place them over the fly. The wing should extend about ½ shank length behind the fly.
Pinch the strips firmly, take a couple of loose wraps over them and tighten the thread pulling upwards.
This should compress the strips right where you want the wings to start.
Take a couple of wraps in front of the first one.
Cut off the butts and cover the remaining bits with thread.
Form a head, whip finish and varnish.
A little difficult
March Brown Spey
The March Brown has already been tied in salmon and steelhead variations with success as mentioned above, but I haven't seen a March Brown Spey, so I set off to make one. Spey flies are characterized by the long, sweeping hackle, and a low wing, and these traits were fairly easy to add to the basic March Brown wet. It's of course tied on a salmon hook and has a silver tag, making it quite a typical salmon fly.
Brown Spey
Martin Joergensen
March Brown Spey
A spey fly for salmon and sea trout based on the classic March Brown.
Fly pattern, materials and tying steps
Modern salmon fly
Martin Joergensen
atlantic salmon (sea run)
sea trout (sea run)
Materials
Hook
Salmon hook, size 2-2/0
Thread
Red, 8/0
Tag
Flat silver tinsel, small
Tail
Mottled partridge fibers
Rib
Yellow floss or tying thread
Body
Hare's wool dubbing
Hackle
Grey goose spey hackle
Wing
Turkey
Head
Tying thread
Start the thread at the hook bend over the barb.
Tie in the silver tinsel pointing rearwards.
Take 4-5 wraps forward and tie down and cut surplus.
Tie in the tail to extend behind the hook bend.
Tie in the rib. If using tying thread, double or quadruple.
Dub the body to about 2/3 up the hook shank. Leave room for the wing and head.
Wrap the rib in 4-5 turns, tie down and cut surplus.
Tie in the hackle, tip first, curved side forward.
Wrap the hackle, stroking the fibers back and down.
Tie down the hackle, trim and cut off surplus.
Cut two symmetrical slips of turkey tail feathers. About 20 fibers in each will do.
Lay down slips over the body and pinch
Take two turns over the tie-in point, and tighten upwards while still pinching.
The wings should fold down vertically.
Take an extra turn just in front of the existing.
Trim wing butts.
Cover butts with thread and form a head.
Whip finish, cut and varnish.
Medium
March Brown Tube
Once I was down the salmon and steelhead lane, there was no avoiding it: tube and shank coming up! Tube flies are very popular in Scandinavia, and the tube version follows the Ullsock tradition more than the zonker wing ditto. The Ullsock (Woolly Sock) is tied in the round, as a grub style fly, and this March Brown is tied with several hackles and no wing. Like many grub and shrimp salmon flies, the rear hackle is a long fibered golden pheasant feather while the central and front hackles are mottled partridge tail coverts as used in many of the larger March Browns here. In the front there's an intruder style very long hackle, made from golden pheasant tail fibers tied in individually. The fly is finished with a black metal cone for balance, and uses a bright yellow piece of silicone tubing as a hook guide. You can fish it using a single, double or treble hook according to taste or local rules.
March Brown Tube
Martin Joergensen
March Brown Tube
A pretty extreme interpretation of the classic March Brown. In this version tied on a tube with salmon and sea trout in mind.
Fly pattern, materials and tying steps
Tube fly
Martin Joergensen
atlantic salmon (sea run)
sea trout (sea run)
Materials
Tube
Plastic, 3.5 mm Ø, about 2.5 cm long
Thread
6/0 tan
Rear hackle
Yellow golden pheasant body feather
Rib
Yellow floss (or 1/0 tying thread doubled)
Body
Hare's wool dubbing
Central and front hackle
Partridge
Front hackle
Golden pheasant tail fibers, tied in intruder style
Inner tube
Plastic, to fit outer tube, about 3 cm long
Cone
Black metal, 4.5 mm Ø, inner diameter to fit tightly over inner tube
Hook guide
Yellow silicone tube
Hook
Single, double or treble. Not too big. #10, 8 or 6 is suitable.
The fly is tied in two sections divided by a partridge hackle.
Remember to leave room for the hook guiding tube - or simply mount it before you start tying.
The rear hackle is tied in, tip first, fibers swept rearwards.
Then the rib is tied in.
The rear half of the body is dubbed.
Rib is wound in 3-4 turns and tied down.
A long fibered partridge hackle is tied in tip first. Select the feather with the longest stem you can find.
The front half is dubbed, leaving space for the front hackle.
Rib is wound in 3-4 turns, tied down and trimmed.
A long fibered partridge hackle is tied in tip first. Again select the feather with the longest stem you can find.
A number of long tail fibers are cut from a golden pheasant tail and separated.
They are tied in a few at the time, sweeping down along the body, covering the whole circumference of the tube.
The thread is whip finished and cut, and then varnished.
The surplus tube is trimmed off with a sharp knife.
The inner tube is melted to a collar in one end and passed through the outer tube, so that the collar sits tightly against its rear.
The cone is passed over the front of the inner tube and secured with varnish or super glue.
The inner tube is trimmed in front of the cone and melted to a collar.
You can use a hook of your choice: treble, double or single.
Medium
Bonefish country
Martin Joergensen
Bonefish March Brown
So we're dealing with dull, tan hare's wool, mottled feathers in brown hues from a partridge and some colored accents, in this case yellow. Quite a few bonefish flies are exactly that: natural colors and an accent of something like pink, red, orange, blue. So why not tie a bonefish March Brown? Indeed why not.
I didn't hesitate and used the classic upside-down bonefish style, where the "wing" is tied on the underside of the hook shank and covers the hook point, a style that has been used in an immense number of flies tied over the Crazy Charlie and Gotcha template. Using the same materials as for all my other March Brown variations and adding some eyes, it wasn't difficult to make a fly, which I'm sure could lure the ghost of the flats.
My experience is that bonefish might be spooky and easy to scare off with a clumsy cast, but when it comes to flies they are as stupid as most fish, and if a fly is presented properly and looks just about edible, fish will go for it - often more than one.
Fished as a shrimp or a crab imitation over darker bottom on a tropical flat, I'm sure a March Brown like this, adapted to the purpose, could bring success.
Bonefish March Brown
Martin Joergensen
Bonefish March Brown
A bonefish fly inspired by the March Brown colors and materials.
Fly pattern, materials and tying steps
Warm saltwater fly
Martin Joergensen
bonefish
Materials
Hook
Wide gape saltwater hook, like Ahrex SA280 size 2
Thread
Tan 6/0
Tail
Mottled partridge fibers
Rib
Yellow floss or tying thread
Body
Hare's wool dubbing
Wing
Mottled partridge fibers, yellow thread from rib
Eyes
Tungsten dumbbell eyes
Head
Tying thread
Start the thread just in front of the hook bend.
Tie in partridge fibers as a tail. Fibers from the mottled tail coverts are longer and coarser and good for the purpose.
Tie in the rib. Double or quadruple if using tying thread.
Dub the body to the front, leaving space for the wing and eyes.
Rib the body in 4-5 turns. Bend back the tags and tie down. Don't cut the surplus!
Collect a fairly thick bunch of partridge fibers, again from the tail coverts.
Tie in on the underside of the hook, tips just reaching and covering the hook point.
Trim the butts.
Tie in dumbbell eyes on the top of the hook shank.
Secure with plenty criss-cross wraps.
Whip finish, cut thread and varnish over the head and eyes.
Easy
Seatrout March Brown
Small but beautiful
Martin Joergensen
As many readers may know, my own fishing is mostly coastal fishing for sea run brown trout in Denmark. There's a ton of flies for these fish out there already, but tying one using the March Brown materials and colors was pretty obvious. Both because I could really use this fly, but also because a lot of the most successful sea trout flies are naturally colored flies with maybe a small dab of color or flash. One of my favorite sea trout patterns is the Omoe Brush, and the fly tied here does show that a bit of inspiration came from Ken Bonde's well known fly.
Finding the right hackle proved a little more difficult than first assumed. I did play around with a "pure" March brown at first, using partridge for the hackles, but the "proper" hackles, from the partridge breast were simply too small and short. The only useful feathers on the partridge skins I had, were either the non-mottled ones from the bird's side or the really nicely mottled or barred ones from the tail. The first ones were a little bland for my taste, the latter are very few on a skin and also almost too stiff and coarse - although very good looking on the fly. So I went looking for alternatives, and one obvious choice was Whiting Farm's Brahma hen saddles, which are the closest you get to partridge in the realm of roosters, hens and chickens. But the ones I had were all grey more than brown, and even the warmest colored one was too cold in the color for my March Brown taste. So off to do some shopping, and the result was a March Brown dyed Brahma hen saddle, close to perfect for the purpose, and the key to a very good looking Seatrout March Brown, perfect for targeting coastal fish in the Baltic.
A March Brown tied grub style for sea run sea trout in the salt.
Fly pattern, materials and tying steps
Cold saltwater fly
Martin Joergensen
sea trout (sea run)
Materials
Hook
Heavy wire wet fly, down eye, like Ahrex NS115 #6
Thread
Yellow 6/0
Tail
Mottled partridge fibers
Rib
Yellow floss or tying thread
Body
Hare's wool dubbing
Hackles
Whiting Brahma hen, warm gray or dyed March Brown
Head
Tying thread
Start the thread just in front of the hook bend.
Tie in the fibers for the tail. Fibers from the mottled tail coverts are longer and coarser and good for the purpose.
Tie in the rib. Double or quadruple if using tying thread.
Dub the rear half of the body.
Wrap rib in 2-3 turns, tie down but leave the remaining rib.
Tie in a hackle, tip first, curved side forward.
Wrap 3-4 turns while stroking back the fibers.
Tie down, cut off surplus.
Dub the front half of the body.
Wrap rib in 2-3 turns, tie down and trim remains.
Tie in a second hackle, tip first, curved side forward.
Wrap while stroking back the fibers.
Tie down, cut surplus.
Form a small head, whip finish and varnish.
Medium
Sea trout country Martin Joergensen
March Brown Intruder
Just as I thought I couldn't bring the March Brown further from its origins, I thought "Intruder!" - and yes, I could. Still March Brown materials and colors, but the rubber legs might get the holiest of the March Brown worshipers to lift an eyebrow. In spite of this, I'm sure this fly could do well if fished for Pacific salmon or steelhead in a clear, fast river, and again: it's a fun drill to tie - and I like intruders in natural colors as a contrast to the normal bright orange, red, pink, purple and blue hues often seen in the large and visually noisy flies.
March Brown Intruder
Martin Joergensen
March Brown Intruder
Another crazy March Brown interpretation... an Intruder. Useful for fishing for salmon and steelhead in fast, clear water.
Fly pattern, materials and tying steps
Steelhead fly
Martin Joergensen
atlantic salmon (sea run)
steelhead (sea run)
Materials
Shank
25-35 mm Intruder shank
Wire
Intruder wire or braided fishing line like Fireline
Hook
Single trailer hook size 6-4
Thread
Tan 6/0 (and yellow 6/0 for the head)
Rear hackle
Yellow golden pheasant body feather and golden pheasant tail fibers
Rubber legs
Yellow silicone, 6-8 strands
Rib
Yellow floss (or 1/0 tying thread doubled or quadroupled)
Body
Hare's wool dubbing
Front hackle
Partridge and golden pheasant tail fibers (see instructions)
Rubber legs
Yellow silicone, 6-8 strands
Eyes
Tungsten dumbbell, 4-5 mm Ø
Head
Yellow tying thread
Thread the wire through the hook eye so that the wire sticks out straight.
Mount the shank in a vise so that it's horizontal.
Start the tan thread in the rear of the shank.
Thread the wire through the rear eye on the shank or lay it along the shank if there's no rear eye.
The hook can be tied in point up or down depending on taste and style.
Tie down the wire along the full length of the shank.
Thread through the front eye, bend back and secure the tags.
Wrap the thread to the rear of the fly.
Tie in a yellow GP body feather tip first.
Wrap 2-3 times, tie down and trim stem.
Cut off 10-15 fibers from a GP tail.
Tie in over the hackle in the full circumference of the fly.
Add rubber legs in the same length, also distributed around the shank.
Tie in the yellow tying thread for the rib. Fold it once or twice depending on thickness.
Dub the body all the way to the front of the shank, leaving room for hackles and eyes.
Rib the body in 6-8 open turns.
Tie down rib and trim excess.
Use a partridge tail covert feather for the first front hackle - or a large Brahma hen hackle dyed brown.
Cut off 15-20 fibers from a GP tail.
Tie in over the front hackle in the full circumference of the fly.
Add rubber legs in the same length, also distributed around the shank.
Whip finish the tan thread and cut.
Start the yellow thread.
Tie in the dumbbell eyes under the hook shank.
Secure with plenty criss-cross wraps and form a large head.
Whip finish, cut and varnish.
A little difficult
March Brown Zonker
Zonkers are a favorite fly style of mine, which I like tying and fishing - if they aren't too big. Large zonkers tend to become very soggy and heavy when wet. But I love the motion in the zonker wing, especially if the skin is as thin and soft as it should be.
This version of the March Brown was a fairly simple pattern to cook up. The materials were basically given, apart from the zonker strip, but since a "hare colored" rabbit is very close to a real hare, and zonker strips cut from it are very easy to get a hold of, it was the natural choice for the wing. It suits the fly perfectly and blends well with the body. You could also opt for a more "partridgy" warm brown zonker strip and get a darker fly. Apart from the strip, it's no frills: yellow rib, hare's wool body and the March Brown dyed Brahma hen for the hackle, which needs more size than a partridge skin can offer in bulk.
March Brown Zonker
Martin Joergensen
March Brown Zonker
A zonker interpretation of the classic March Brown. This fly should do well for both sea run browns, and stream base brownies and bass.
Fly pattern, materials and tying steps
Cold saltwater fly
Martin Joergensen
sea trout (sea run)
smallmouth bass
Materials
Hook
Down eye wet fly or streamer hook, like the Ahrex NS115, #4
Thread
Black, 8/0
Rib
Yellow floss or tying thread
Body
Hare's wool dubbing
Wing
Narrow rabbit zonker strip, "hare" colored
Hackle
Whiting Brahma hen, warm gray or dyed March Brown
Head
Tying thread
Start the thread in the rear of the hook shank.
Tie in the rib. If using tying thread, double or quadruple the thread.
Dub the body with hare's wool, leaving a bit of space for hackle and head.
Cut a zonker strip, the skin being about 1½ shank lengths.
Cut the front end of the skin to a triangle shape for easier tie-in.
Tie it in in front of the body, leaving space for hackle and head.
Pull to the rear, separate hairs and secure it with the rib.
Wrap the rib forwards in 4-5 open turns, each time separating the hairs on the strip and securing it to the body.
Tie down the rib and trim surplus.
Select a hackle, barb length about ½ shank length.
Tie in tip first, curved side forward.
Wrap the hackle, stroking back the fibers to create a classic wet fly hackle.
Tie down the hackle and cut off the stem as close to the fly as possible.
Form a head, whip finish and varnish.
Easy
March Brown nymphs
I finally pointed my attention to the smaller hook sizes - in this case a size 12 - and tied a couple of March Brown nymphs. These still use the basic materials: partridge, hare's wool and yellow rib, and are both really simple. One is basically just the wet fly body, but utilizing some spikier dubbing with guard hairs mixed in for the thorax, while the other has a full yellow body, a dubbed thorax and a bead for weight. Both are very generic, and should work well as an imitation for basically any mayfly nymph in the light tan specter. The yellow body may seem a little bright, but once wet, it becomes more olive, and will not be far fetched as an imitation of some of the brigther nymphs.
March Brown Nymph
Martin Joergensen
March Brown Nymph
A generic nymph tied in the march brown colors.
Fly pattern, materials and tying steps
Nymph
cutthroat
grayling
Materials
Hook
Wet fly or nymph hook, like an Ahrex FW580 #12
Thread
Tan 8/0
Tail
Mottled partridge fibers
Rib
Yellow tying thread
Body
Hare's wool dubbing, underwool
Thorax
Hare's wool dubbing with guard hairs
Head
Tying thread
Start the thread in the front of the hook shank.
Cover the shank half way to the bend.
Prepare a few partridge fibers for the tail. It can be rather long 1-1½ shank lengths, but 10-20 fibers will do.
Tie in the tail and cover to the hook bend.
Tie in the rib at the hook bend. Double the yellow tying thread.
Dub the body very sparsely leaving room for a thorax.
Rib the body with 4-5 turns of doubled thread.
Tie down rib and trim off surplus.
Pick out some very spiky dubbing from the hare skin or mask.
Dub the front part of the fly generously, letting the guard hairs stick out.
Form a small head, whip finish and varnish.
Easy
March Brown Beadhead
Martin Joergensen
March Brown Beadhead
A small, heavy and bright March Browny nymph.
Fly pattern, materials and tying steps
Nymph
Martin Joergensen
cutthroat
grayling
Materials
Hook
Wet fly or nymph hook, like an Ahrex FW580 #12
Tying thread
Tan 6/0
Bead
Brass, app. 3.5mm like Bidoz No 2
Tail
Mottled partridge fibers
Body and rib
Yellow tying thread
Thorax
Hare's wool dubbing with guard hairs
Slip the bead over the hook shank.
Cover the front bit of the shank with tying thread for a tight fit.
Whip finish and cut thread.
Add some super glue and slip the bead over the thread and glue.
Start the thread behind the bead and cover the hook shank half way to the bend.
Prepare a few partridge fibers for the tail. It can be rather long 1-1½ shank lengths, but 10-20 fibers will do.
Tie in the tail and cover to the hook bend.
Tie in the doubled yellow tying thread at the hook bend.
Wrap it in close turns to behind the bead, leaving some space for a thorax.
Keep the thread flat, untwisting it as you wrap.
Wrap it back and forth a couple of times to build up a body.
End up at the hook bend.
Now twist the two strands of thread to form a rope.
Wrap the rope forward as a rib in 3-4 open turns.
Tie down and trim tags.
Pick out some very spiky dubbing from the hare skin or mask.
Dub generously behind the bead, letting the guard hairs stick out.
Whip finish behind the bead and trim thread.
Carefully add some varnish behind the bead to secure thread.
The Global FlyFisher has been online since the mid-90's and has been free to access for everybody since day one – and will stay free for as long as I run it.
But that doesn't mean that it's free to run.
It costs money to drive a large site like this. See more details about what you can do to help in this blog post.