


A Mad Epoxy Tier
Bob Kenly is reknowned for his radically different epoxy tube flies. This article recaps his experience with epoxy - and adds advice on coloring epoxy. If you want some truths about epoxy - and want to witness the death of a couple of myths

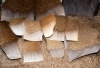
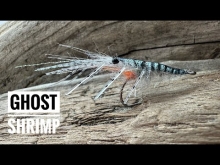
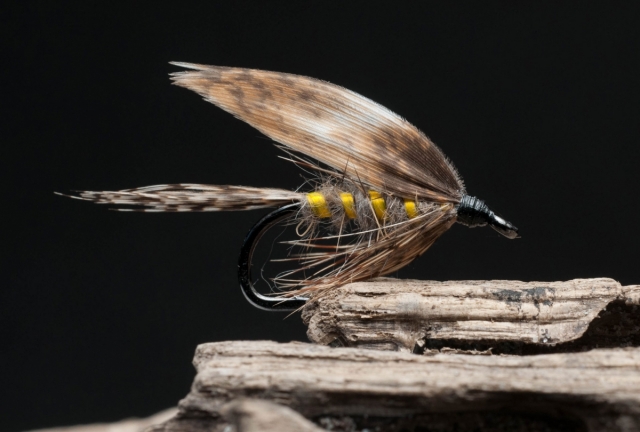
A tinted shrimp
|
My fellow tiers accuse me of being absolutely crazy, my friend Yuri Shumakov used to scream that I was a mad man. OK, so maybe I am slightly twisted in the wrong direction when it comes to tying on tubes but I like going where few go. Epoxy gives me that latitude to try some artistic challenges since I'm drawing challenged and too old to continue ski jumping (had a problem with trees) or playing hockey (couldn't skate well or shoot so fighting was my part of the game, lost most of them). Everything I learned about epoxy tube tying was a matter of trial and error (mostly error) but here are some of the lessons I have learned that allows me some sort of comfort zone while playing with this medium.
Things you gotta have or would be nice to have
Epoxy: I use only one brand of epoxy, Devcon in the 5-minute mixture and 2-Ton mixture. The 5-Minute stuff is good for building stuff but it does start to harden quickly after mixed and gets very hot If you are worried that the material might be damaged by the heat you will have to go to the 2-ton stuff which doesn't heat while drying. Also the 5-minute stuff doesn't have the strength of the 2-Ton stuff so if I build something out of the 5-minute mixture I always cover the 5-minute stuff with 2-ton stuff. Devcon products are very stable and predictable (if I was interest in unpredictability I'd sign up to drive a fuel tanker in Iraq) and don't have that objectionable smell usually associated with epoxy (the data sheet says they have no solvents and are 100% reactive). I buy both types in 25 ml. double tubes which mix a perfect 1:1 ratio. You can buy this stuff in bulk sizes but considering the cost and mixing hassle I just stick with the 25 ml. tubes.
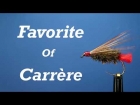
. This fly took a Direcor's choice at the 2001 Irish Open Fly Tying Championship held in Dublin Ireland. A clear coat of epoxy was applied after the coloring was cured.")
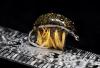
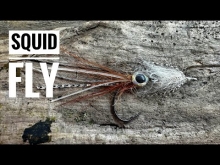
A French squid in Irish colors
|

Hi-speed squid
|

Another French squid
|
A rotary vise: Life is so much easier with one of these especially when playing with epoxy. (More here, ed.).
Toothpicks: You may read some places that wood contaminates epoxy, BALONEY, toothpicks are cheap, work just fine (I always use the round ones) and you can always chunk them out after mixing and applying epoxy.
Sticky note pads: perfect for mixing small amounts of epoxy. Again, some say the coloring on these pads can get into the epoxy, after 15 years I still haven't had this problem. For larger amounts of epoxy I use a sheet of aluminum foil which I fold several times.
Denatured Alcohol: For cleaning up spills and mixing with epoxy to thin the mixture. Do not use medical alcohol as it has too much water.
Clear nylon sewing thread: neat stuff but somewhat slippery to tie with. The beauty of this thread is it disappears under epoxy. Again, cheap and readily available.

Epoxy fly turner
|
Something to turn your work while drying: Sometimes called a dryer, I never found one that did what I wanted it to do so I built my own from bits and pieces I salvaged from a rod turning motor. After 15 years it still works albeit it looks a bit klunky but it fits my persona just fine, thank you. On that note another thing that is handy is some sort of rack to cure your flies on, a board with small nails (cut the heads off) works perfectly. (You can also build your own rotor, ed.)
A trash can of some sort: That goes without saying anything more.
And finally, old clothes: you're going to dribble some on your clothes, it seems to happen especially when you're wearing some good clothes. Epoxy seems to soak into the fibers and nothing you do will stop it from hardening. Rather then trying to explain how you got your clothes solidly stiff it’s easier to have something that won't get ruined.
Drying and curing
There is some confusion regarding these epoxy terms and the data sheets don't seem to clear this up too well. They use a term called "functional cure" which is basically a time that the epoxy is hard enough to touch (about 2 hours will usually cover most epoxies). "Full cure" is when the epoxy reaches its maximum strength (Usually 12 hours).

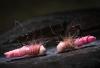
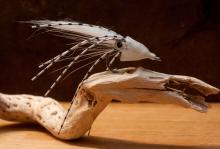
Epoxy shrimp
|

Popper before epoxy
|

Popper after epoxy
|
Coloring epoxy
Oh Man!!! I've tried just about everything you can think of to add coloring to epoxy. I read in a fly fishing magazine that you can mix granular dyes with alcohol to make a color mixture which will tint epoxy, NOPE, another mess for the trash can. Another disaster I made was when it was suggested I mixed some finely chopped dubbing like SLF to the epoxy, result a gooy pile of dubbing that refused to mix with the epoxy (it was pretty though even if totally useless). The only thing I found that mixes well with epoxy is artists acrylic colors, I know it says that water is the death of epoxy and acrylics is water based but the stuff mixes perfectly, I don't have a clue why this is but it works so don't argue. You can get acrylics in all sorts of colors or better yet mix your own, its cheap, readily available and doesn't stink either (almost too good to be true). Some acrylic paints have wax, look for paints that don't have wax as its easier to control. I prefer to mix my epoxy and acrylic on an piece of aluminum foil, placing a dab of acrylic on the foil and picking up a small amount of acrylic on a toothpick and adding it to the mixed epoxy until I achieve the desired coloring. I have mixed coloring to the 5-minute epoxy but if you are unsure of your timing use the 2-Ton stuff as it has a longer working time. You can increase the working time a bit if you add a small amount of alcohol to the mixed epoxy, Use a thin straw as a pipette and dribble a small amount into the epoxy and mix, then add your color. If you are trying to achieve an opaque color do not try to do it with one coat, I did it once or twice but its a crap shoot whether it'll work out, I use another method myself to achieve a deep rich color.
To get a solid color I first cover what I'm building with 5-Minute epoxy and let dry, then I sand the object with fine sandpaper, clean with a piece of paper towel and alcohol. Then I undercoat the area with acrylic of the same color as the finished product will end up as. After thats dry I then apply a coat of the epoxy/acrylic mixture over the painted area. Sanding has two important effects: first, it allows the paint to adhere without sliding like it would on a slick surface. And second, epoxy has a tendincy to pull away and pool on slick surfaces, sanding seems to eliminate that problem.
Varigated coloring
Now this can be tricky as heck but it does produce some interesting effects. The idea is to take some acrylic coloring on a toothpick and apply it on to wet epoxy. When the fly is on the dryer (turner) the coloring spreads in some interesting patterns, its always a surprise to see what the end result is when dry. It takes a bit of planning to accomplish this sort of finish but well worth the effort. When doing this you want to make sure your base color (epoxy/acrylic mixture) stays wet, mixing the base coat with some denatured alcohol will slow down the curing some, the idea is to have the coloring part of the epoxy not just on it (is any of this making any sense). The best results are achieved putting a darker color into a lighter color, I have done the reverse but the darker colored base seems to swallow up the lighter color.
Seperated coloring
Lets say for argument sake you're making a popper, the head area red and the rest white. You've done your sanding of the first epoxy coating and sanded it. Next establishe where the two colors will seperate and wrap that area with thread to make a sort of dam (nylon sewing thread works best as it disappears under epoxy). Undercoat each section with the desired color using acrylic (in this example where white is most of the color I do the whole fly first but with other colors it may not work as well and best kept seperate). Now, mix an epoxy /acrylic mixture and apply to the largest area up to the thread dam, turn and let dry. After its dry and cured again do the same thing to the other colored area, turn, let dry and cure.
Translucent coloring
A minute amount of acrylic will cover that but mix very well. Artists ink is another option to mix with epoxy, look for something called "Transparent Water Color Ink. Start with a very small amount and mix well, add ink till you get the desired shade.
Color projection: (Don't try looking it up anywhere, I just invented that term). Some years ago I did some flies where the coloring was in the center of the fly and projected to the outside of the fly. I was making small zonker style flies with a lead former in the center of the fly. The body was completely filled with epoxy and was wrapped with a pearl braid then that was covered with long drying epoxy. The only problem with this was the body appeared dull almost the color of the lead. Glueing shinny aluminum foil on both sides of the former before applying the epoxy the end result was a brilliant fly. Since that worked so well I wondered if colored foils would have the same effect, BRILLIANT !!! that worked too. Unfortunately, due to its uneven hydrofoil shape when retrieved fast or in rapid water the fly had a tendency to lay on its side. The fish didn't care and a Swedish friend still uses them for Sea trout.
Ernesto "Che" Guevara
When things go wrong @@###
Swearing helps, crying sometimes. Even with a good epoxy sometimes the Gods get cross and after an overnight cure the epoxy has damp spots. It happens to everyone once in a while and I'm unsure of the reason, maybe not mixing well enough, or the epoxy too old, what ever, the best thing to do is take that tube of epoxy and religate it to the trash can. Covering the damp area with Sally Hensen's Hard As Nails (a clear fingernail polish) is a good cure but remember that area will have lessened strienth. Even if you choose to cover the whole fly with another coat of epoxy I would still do this to the affected area as there may be some contamination.

Epoxy mess
|

Tom Berry's shrimp
|

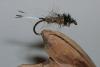
Non-reinforced
|
Always mix enough epoxy to finish what you are doing at that one time, more is always better, not having enough is a disaster. Wet epoxy has a tendency to sag so keep turning your vise when applying epoxy. If you apply too much epoxy to and area and turn your work the epoxy will creep to where you don't want it, several layers is always better than one heavy layer. Sanding helps this malady but but a cure in all cases. On very smooth surfaces epoxy will pull away and pool where you don't want it, again if practicable sanding helps but where it isn't let the epoxy harden some then apply to your work. However, when you are picking up epoxy with you toothpick and the epoxy seems to string, stop, and mix fresh epoxy.
Adding glitter to clear Epoxy
OH YEAH! I love doing that, I have found a bottle of glow in the dark glitter at a craft store that works perfectly. It comes in a salt shaker type bottle and even looks about the size of salt crystals. I've added small amounts to epoxy and even went nuts with a lot of glitter, both methods seems to work as well with no problems in curing of the epoxy. I'm sure there is a cut off point but so far I haven't reached that stage yet, the only consideration is that you want the epoxy to spread and dry evenly when turning. I have tried so called glitter that look like minature sequins but found that these dried in the epoxy at odd angles at times and didn't reflect light, in fact they appeared as dark spots.
Reinforce or not reinforce
Conventional wisdom says that any material that has a reinforcing material imbedded in it is stronger with than without (something like reinforced concrete). It is true that reinforcement will keep a project together if its cracked but I personally think its the epoxy that provides the straingth not the imbedded braided material. I use materials like E-Z Body Braid to establish the shape of an object, but I have also used plain paper to do the same thing in fact thats even easier to do since you don't have to make sure all the holes in the braid are filled (unless of course you're thinking of submarines).
Retrospect
Most people start tying with epoxy like I did, lathering the stuff on flies to protect them from fishy teeth and after a while drift into what I call epoxy sculpting. The fun begins when you try something new and find yourself deep into a project that consumes all your thoughts and skills as a tier. So far just about all of my epoxy sculpting has been limited to shrimp and squid flies but I'm sure I'll be quickly bypassed by the many talented tiers around the globe. I've been doing some reading about a new epoxy that is cured in about 10 seconds using a LED light. The idea sounds promising but as of yet I haven't worked with this product. You can read about it on: www.wetahook.net

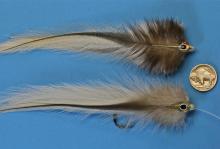
Striper flies
|
More
Bob Kenly's home page Nordic Way Tube Flies
More on epoxy
More on tubes
Devcon 5-minute epoxy
Devcon 2-tone mixture
Other Devcon epoxies
Read more about why you should register.
Related content


More content from the front page


Since you got this far …
The GFF money box
… I have a small favor to ask.
Long story short
Support the Global FlyFisher through several different channels, including PayPal.
Long story longer
The Global FlyFisher has been online since the mid-90's and has been free to access for everybody since day one – and will stay free for as long as I run it.
But that doesn't mean that it's free to run.
It costs money to drive a large site like this.
See more details about what you can do to help in this blog post.
Comments
Heres another little
Heres another little known fact my father Robert Kenly has many years of apoxy and fiberglass experience. I remember he built a sail boat in our garage, the "All Girl III" in the late '70's. Designed, crafted and named in honor of his three daughters. Sadly, the "All Girl III" never made it to water, but built with his own hands and covered with, what seemed to an eight year old girl a foreign substance. The boat survived harsh weather year after year in our back yard and outlasted many of the cars we bought through the years. Trust my fathers apoxy methods and tips they will absolutely serve you well.
Good evening, Colo
Good evening,
Colouring expoy is easy !
Just go to any fibreglass trade shop and ask for a colour, there is about 50 or so different colours.
Sometimes even the colour pastes for polyester...fibreglass work beautifully.
Kind regards,
Uncle Barry
John, You have
John,
You have to wonder why there isn't some maker of dryers uses this method for tube flies, everything I've seen is for hooked flies. I keep a box of alligator clips on my table for clamping also, they are handy also for holding your work instead of using your fingers which always seem to get in the way while epoxying. Thank you for the kind comment.
Interesting artical.
Interesting artical. Built my rotary dryer from a rotisserie motor and three foot length of steel rod. Epoxy small alligator clips to a couple of dozen spring cloths pins and you have a dryer that changes the angle of the fly quickly (preventing sags) and you can easily remove or add flies. The three foot rod allows you to sort by cure time.