


DIY Epoxy Rotor
If you tie a lot of epoxy flies and have been glancing in the direction of the nice but expensive epoxy rotors in the local flyshop, you may want to consider building your own out of some scraps and a disco mirror ball motor.

Look Ma, no foam!
|
We should be dancin', yeahhhhh...
Remember when disco was big? Remember those mirror balls hanging under the ceiling, casting their magic, moving spots of light on the walls?
Well, that's where we're aiming.
Not the disco, that is, but the mirror balls.
And not even the balls, but the motors that turn them.
Such a motor runs with less than 5 RPM and often down to one or less. That's what we're looking for. We need a motor that can turn fast enough to keep our epoxy from sagging, but not so fast that it gets spun off by the centrifugal forces.
Such motors can be had for as little as 10 USD or 8 Euros. I paid 85 Danish Kroners for mine in an electronics shop. That's about 15.-$/11.-€.
If you were a DJ back then, you might even have one lying around...

A motor - and scraps
|

Bolt on axis
|
Scraps
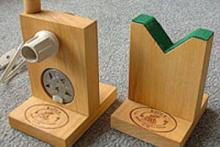
Apart from the motor we need:- A couple of small bolts. 5mm Ø (1/4") is fine, but the size is not critical. The length should be about 1.5-2 centimetres or approx. 2/3 of an inch. One can be shorter and must fit the mounting holes in the motor flange.
- A bunch of nuts and dishes for the above
- A piece of scrap wood - 5x10 centimetres or 2x10 inches and not too thick is good.
- An angle iron (angle bracket) of suitable proportions
- A couple of wood screws
- A dish of plastic, 10-15 centimetres Ø (4-5") and some soft foam to pad it with ...or...
- A dish of hard foam, similar diameter
- Double sided adhesive tape
This is just a suggestive list. As you will see, it's not really critical in any way, and you can improvise with what you have.

Lid trimming
|

Wood and iron
|

Motor mounted
|

The mount
|

Done deal
|

Flies up to dry
|
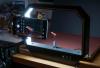
Basic construction
What we're aiming at is getting the motor to sit with the axis horizontally and a foam dish mounted perpendicular on that.Here's what I did:
- I glued a bolt head first to the axis of the motor - with epoxy, what else? I made sure the two were absolutely in line and let the 5-minute epoxy set for 24 hours before continuing.
- I cut the top of a plastic lid for a bunch of writeable cd's. I found that to be of a suitable stiffness and diameter. I just left a small rim to sturdy the disc and facilitate mounting the foam
- I cut a disc of thin foam from an old camp mattress scrap. I just pressed the disc into the foam and cut along the depression
- I drilled a small hole in the centre of the disc
- Now I dug out a piece of scrap wood and cut off a 25 centimetre or 10" bit
- In my workshop I found a large angle iron
- I mounted the iron on the wood with a couple of screws
- I then mounted the motor on the iron with a bolt
- Lastly I attached the disc to the axis/bolt with a couple of nuts and discs
Variations
This construction has one major drawback: because of the thin foam, it doesn't hold large flies. For my use it's sufficient, but if you want to dry really large saltwater flies, you need thicker and sturdier foam.My basement is full of old boxes from computers and electronics, and some of these are stuffed with foam padding of different qualities. If you are like me and save these things, find a suitable block of foam, cut a couple of discs and get rid of he rest! You won't need it anyway... but that's a whole other story.
This foam might be sturdy enough to be able to mount directly on the axis, but you may also just stick it onto a disc like the one described above with some double-sided tape.
In use
Just plug your newly constructed rotor into the wall socket and let it run. Use one-hour epoxy to enable yourself to cover a lot of flies before it settles.Prepare a whole bunch of flies. The disc on my rotor easily handles 15-20 flies. Now coat them with epoxy in your rotary vice and transfer them to the rotor. It runs so slowly that you can easily stick the fly in a vacant spot without turning off the motor.
Let the flies turn for as long as you please - and more than the single hour prescribed - and you will probably have some very neatly coated and smoothly finished flies once the epoxy has settled.
Don't feel tempted to check the progress of the settling by poking a stick in a fly. You will most likely draw strings from it and mar it. Check the remains of the epoxy in the container you used for mixing. When that isn't sticky any more but hard as glass, you can turn off the motor and pick out the flies.
Read more about why you should register.
Related content


More content from the front page


Since you got this far …
The GFF money box
… I have a small favor to ask.
Long story short
Support the Global FlyFisher through several different channels, including PayPal.
Long story longer
The Global FlyFisher has been online since the mid-90's and has been free to access for everybody since day one – and will stay free for as long as I run it.
But that doesn't mean that it's free to run.
It costs money to drive a large site like this.
See more details about what you can do to help in this blog post.
Comments
For big flies on the
For big flies on the turner I really like pin clips like those sold by Hareline. One could easily make his own from big needles, alligator clips and some solder I think.
I myself used my rod
I myself used my rod building drying motor,and cut a 2-3 inch piece of plastic dowel (doesn't have to be plastic, could be wood), a round cut piece foam attached with a washer & screw to dowel. alligator clips found at electronics stores solder pins to each clip. Now you have a fly drier/flyrod building dryer.
Anonymous, I thin
Anonymous,
I think 2 rpm will be just fine, and if I were you I'd just go ahead and build the rotor with the motor you have there. I doubt that you will have any problems with that.
Martin
I have a question I
I have a question I have found a disco ball motor in my garage and on the box it says 2 rpm is that good enough or maybe more? You said it had to be fast enough to not make epoxy sag and not to fast to spin the epoxy off! so I'm wondering should I keep it or buy something faster?
use a light dimmer s
use a light dimmer switch on the motor, that way you can control the speed, and have a lot more latatude in motors. old sewing machine motors ( with the footpedal) are great for a lot of applications like this (my wife gets them at yard sales)
Well done, beats min
Well done, beats mine all to heck! Thanks for the info.
Hello, I also found
Hello,
I also found the motor from disco ball and spend some time for making dryer :)
Here it is.
it's great
it's great
Searched for "epoxy
Searched for "epoxy fly dryer" on google and found some good infomation last night on www.Reeltime.com discussion group. 1. Use "disco ball" motor. Some Electronic Repair companies may carry them. 2. Remove "Barbacue Roto Motor" from grill. 3. Remove "Sponge Drum Humidifier motor" and use it.
Go to www.scientificsonline.com for motors 3-4 rpm. They have small motors for $5 or so and a heavy duty 115v for $25 I think.
Also, check out www.hagensfish.com for "plug drying table" on pp. 156 and they have 4 rpm motors for $12.95.
Also check out www.jannsnetcraft.com for Rod building motors on pp. 62-63 of catalog.
A great comment from someone on reeltime discussion said he used his Rod making motor. Put in a fiberglass/graphite Rod -- put cork rings every 6" and attached his epoxy flies to the cork. He said he could put 2-3 doz. flies on one Rod. After turning for 2 hours -- he stands the "Rod/Flies" up to finish drying and puts in another Rod/cork and starts a new batch of epoxy flies.
Hope all of this helps.
In His Love,
Clyde
I have had success y
I have had success yanking motors from microwave ovens - the motor that turns the turntable works very nice and they can be had for free at the transfer station (aka: junkyard). The only advantage/disadvantage is mounting will vary and you will have images of bacon rather than disco sartorial nightmares.
This is a great idea
This is a great idea and good infomation. The main problem is finding the motor that is small enough and inexpensive. In the USA I can't find any for less than $20-25. Any suggestions?? Any Sources?? Thanks, In His Love, Rev. Clyde
Super DIY-informatio
Super DIY-information.
I've just started to make my first Epoxy-flies, and this "contraption" i just what you need
if you dont want to spend hours turning one fly at the time in your vice.
I've made the following minor changes to your "patent".
1. Mount it on a broader base. It'll make it much more stable
2. Install a switch for the motor - it makes at lot easier to turn the motor off/on when mounting "wet" flies.
If you're looke for places to buy the motor - try karaoke-equipment shops on the net.
The top from a CD-box is at super idea. It's perfect in size and weight.
The foam for mounting the flies was at problem to me, untill I saw a "knee-pad" for
gardening at the local buildingmarket. It's slightly thicker than what's shown, but it'll
easyly hold big flies.
Super info and idea!!