


Tying the Matuka style
Who would have guessed that a fly tied to fish the lakes of New Zealand would have such an impact all around the world?
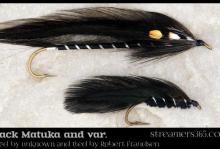
Black |
|
| Overbody: | Black SLF |
| Rib: | Silver |
| Wing: | Black |
| Collar: | Black |
Olive |
|
 Olive Matuka (pattern below) |
|
| Overbody: | Olive Hare's Ear or Squirrel Dubbing with a red hot spot |
| Rib: | Silver |
| Wing: | Grizzly Dyed Olive |
| Collar: | Grizzly Dyed Olive |
Badger |
|
 Badger Matuka (pattern below) |
|
| Overbody: | Red Wool Yarn |
| Rib: | Gold |
| Wing: | Silver Badger |
| Collar: | Silver Badger |
Furnace w/hotspot |
|
| Overbody: | Pearl Lite Bright with red hot spot |
| Rib: | Silver |
| Wing: | Furnace |
| Collar: | Furnace |
White |
|
| Overbody: | Pearl Lite Pear |
| Rib: | Silver |
| Wing: | White |
| Collar: | White |
...you get the idea.
Who would have guessed that a fly tied to fish the lakes of New Zealand would have such an impact all around the world?
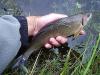
My introduction to the Matuka style of streamer was quite innocent. I had just started fly fishing and my friend Bruce had given me a box of flies that he had tied for me. All sorts of wonderful flies that I didn't recognize at the time, one being a badger and red Matuka. I didn't know it's name or it's history - I just recognized it as a "cool" looking fly.
Later that year, my friend Gary took me to a new stretch of our favorite smallmouth stream and I tied on Bruce's Matuka. I wasn't casting very well at the time and was just able to flop the fly out into the current. Fortunately for me, the smallmouth were cooperative that day. As I let the current take the fly downstream, I'd strip it back with short quick strips, more often than not having my retrieve haulted by the bumping take of a little smallmouth bass. I remember the day as clearly as if it was yesterday, as it was the first time I had ever been "into them" with a flyrod in my hands.
Years later
A few years later, as I started tying my own flies, I dug out Bruce's Matuka to use as a reference for my own attempts, but just couldn't seem to get the hang of tying this style of streamer. And since I had recently discovered the potency of marabou and "buggers", I abandoned that once magical style of fly almost completely, favoring instead flies that were a bit easier to tie.
The first time the Matuka reappeared in my consciousness was in the form of a rabbit strip leech. Instead of tying them "zonker style", I prefered to tie in the rabbit strip "matuka style", with a ribbing wire holding the strip in place as it is spiral wrapped along the body of the fly. A black rabbit strip leech proved to be a very effective fly for smallmouth and largemouth bass. Unknown to me at the time, passing the ribbing wire through the dense rabbit fur was good practice for the "real" Matuka's I'd be tying sometime down the road.
Perfect for Matuka's
One day I was sitting at my tying desk just sort of staring at the mess of materials spread out in front of me when I noticed a few stray hen saddle feathers. They were a little on the smallish side, but they were dyed a intense black and had a very nice rounded tip. I picked up one of the feathers and stripped about half the barbs off the bottom of the hook and it hit me - these were PERFECT for Matuka's.
I shoved everything aside and got out my salmon hooks and the hen saddle and starting plucking feathers. After a bit of tying, I had a rather nice look Black Matuka. And I was in love with the style of fly once again.
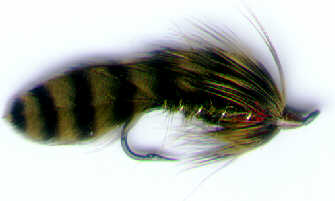
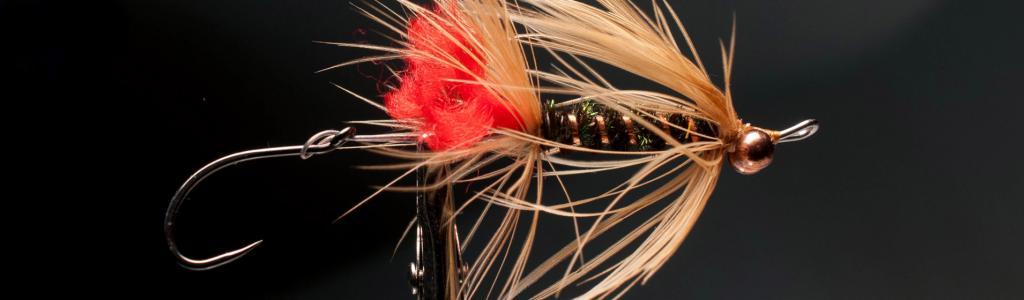
A typical Matuka has five basic parts:
- The hook
- The body
- The rib
- The wing
- The hackle collar
Hook choice
For most of my Matukas, I like an up-eye salmon hook like a Tiemco 7999, a Partridge "N", or even a Mustad 36890. Since I add a few turns of lead wire underneath the body, the up eye hook ensures that the fly will ride properly in the water. Some hackles will lend themselves to longer flies, so I will switch hooks and use something like a 4xl streamer hook (Tiemco 9394, for example). A looped eye can help when you're tying in the wing butts, but it's not as critical for these flies.
Body considerations
The body of all my Matuka's consists of a few turns of lead wire, an underbody of floss, and an overbody of dubbing or yarn. As mentioned earlier, the lead wire helps keep the fly under the surface of the water as you strip it across a current. I don't weight them heavily, just four or five wraps of a medium weight lead wire. Over the lead, I build up an underbody of single strand floss (using a bobbin). I build the underbody to a slight teardrop or "cigar" shape so that the fly has a hint of "belly" when completed. I don't know if the fish care all that much, but it helps hide the lead wraps and it just looks good to my eyes.
I coat the floss with a layer of flexament to keep the lead from bleeding through and discoloring the outer materials. I then dub a thin body over the floss as the final layer. It's important to make sure the floss and the dubbing are complimentary, otherwise the fly will change color when it is wet. Not only is the thin layer of dubbing over the floss body pleasing to the eye, it helps to prevent the ribbing material from sinking into the body and disappearing when tightly wound. A few Matukas will call for a bit of a hot spot in the body just beneath the hackle color, usually a bright red to indicate gills. In these cases, I just stop the body a few turns short and finish with a bright red dubbing, such as SLF
or some other flashy synthetic.
Ribbing
For most of my ribbing, I use a fine oval tinsel. Lagartun makes a fine tinsel that is very strong for it's size and has yet to break when tightly wound. It is thin enough not to interfere with the shape and structure of the feather wing, yet visible enough in the finished fly to add a bit of flash and segmentation.
Wing
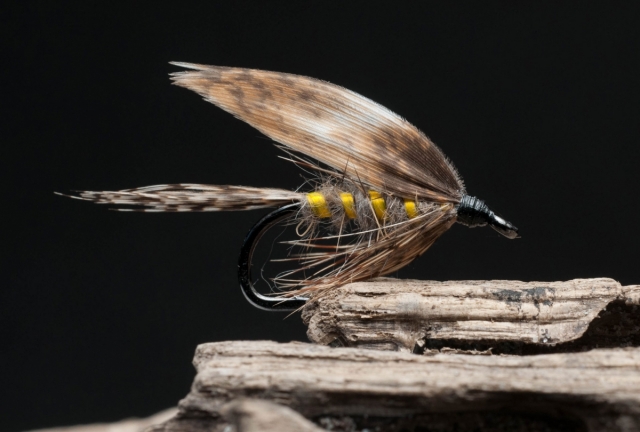
The wing is the most important part of the Matuka streamer. The three materials I use primarily for the wing are hen saddles, rooster body feathers, and Chinese neck hackles. The hen saddles and rooster body feathers are similar in that they are both very blunt and rounded and almost solid web. Two feathers are sufficient to form the wing. These usually lend themselves to smaller sized flies. When I use Chinese neck hackles, I usually use four hackles, as they lack the web of the other feathers. I find Badger and Furnace to be particularly attractive for Matuka wings, as the black center bar offers the impression of the lateral line found on many minnow species. Grizzly (natural and dyed) is another favorite.
Hackle Collar
The hackle collar is the final touch to the Matuka. I use the same type of feather for the hackle as I do for the wing - for consistency in the fly. I make sure the barbs are the same length, so the top of the collar seems to blend in well with the hackle wing. I always fold the hackle and tie it in by it's tip and wind forward. This is advantageous for a few reasons: it allows for a small neat head on the fly; the longest barbs are foremost on the collar, proving a nice "shouldered" look, and the hackle naturally sweeps towards the rear to join with the wing.
Hardest things
Probably the hardest two things in tying a Matuka streamer are matching the wing hackles and binding down the wing.
Let's assume you have the ribbing tied in, the body completed, and are ready to add the wings...
Select two (or four) hackles for the wing such that they are opposing pairs, if possible. If the hackles are from a package of strung feathers, look for feathers that have the same shape and barb length while having opposite natural curves. This will ensure the wings will come together and appear as one in the final fly. Once the feathers are selected, take one and measure it against the fly to gauge the proper length. In most Matuka's, the wing should extend beyond the body of the fly a length equal to the shank of the hook. Once this length is determined, leaving a spare 1/8" or so for the tie down area at the head, snip the shaft of the feather. Trim all the other feathers to the exact same length as the first one.
At this point, the feathers are almost ready to be tied in and secured in place as the wing of the fly. In fact, some tyers go no further with wing preparation and tie them in just as they are. Some prefer to partially fold the hackle so that the "bottom" barbs are out of harms way, while still others prefer to strip a portion of the barbs off the bottom of each hackle so that the part of the hackle that touches the body of the fly is bare. I prefer to strip the barbs if for no other reason that I think it makes it easier to bind down the wing properly. No extraneous barbs are in the way as you wind the rib forward.
Left and right
No matter if you use two, four, or six hackles for the wing, there are going to be a set of "left" feathers and a set of "right" feathers. You need know how each feather will be used as you set about stripping the hackles off the "bottoms", as the bottom of the right feather will be the opposite of the bottom on a left feather, so that when they are paired, the stripped portions will be against the body of the fly. Again, take one hackle in hand and measure it against the body of the fly. Strip off those barbs that would touch the body. Using this feather as a template, strip the barbs off the remaining wing feathers. Again I caution you to keep track of your left and right feathers. It seems that every sitting where I'm tying Matuka's, I screw up a feather or two by stripping the wrong side. It's not a disaster, but it slows you down as you select and prepare a replacement feather.
So now you have all your feathers prepared - clipped to the exact same length and stripped of barbs along the bottom as appropriate. It's time to secure them to the hook and bind them down to the body.
Steps
The first step is to ensure that the tips of the feathers are matched. Take the lefts and rights and hold them together so the concave sides, if present, are facing. I find it easiest to match one feather at a time, so start with the inner pair, match them, then add the outside pair one feather at a time. When you're done, the tips of the feathers should be as perfectly matched as possible. Hold the wing firmly in hand and tie the butts down near the eye of the hook with several turns of thread. Check the proportions again to make sure the wing is positioned probably so the bare stem is matched with the body. Make any adjustments needed, as this is the only chance you'll have.
Once you're happy with how the wings are positioned, make a few very tight wraps to hold them firmly in place. You have to handle the wings during the first wrap of ribbing and if they are not tightly tied in, they will slip and cause you considerable grief.
Wing on the body
It's time now to bind the wing to the body of the fly with the ribbing tinsel. This can be tricky at first, but there are a few things you can do to make it easier. The very first wrap of tinsel through the wing is the most critical, as it secures the wing in an "on edge" orientation as well as stretching the
wing tightly across the back of the fly's body. I make my first turn of ribbing at the very end of the body - almost on the bare hook shank. It's more of a thread wrap style than an open spiral turn of ribbing, as my goal is to secure the wing down correctly and tightly with that first wrap.
First turn of rib
Hold the wing back behind the bend of the hook and make a little part in the hackles barbs with a bodkin or needle. Thread the tinsel through this opening and bring it down on the far side of the hook softly. Make sure the tinsel is tying down the feathers' stems, not hackle barbs if possible. Bring the tinsel up on the near side of the fly and hold it straight up - still softly. We haven't pulled this tight yet at all. Now hold the wing back very tightly with you fingers pinched close to the opening where the rib went through and pull the ribbing tight in an upward direction. Release you fingers and see how the wing is positioned. It should be perfectly verticle at this point, tight along the back of the fly, and centered along the body. If the wing isn't setting right, you can try moving the wing while keeping tension on the rib, but I've found it's best to start over again with that first wrap. The key is to keep things loose and soft until you're ready to snug that first turn of ribbing tight. Once you've tightened the rib and are happy with how the wing is sitting, make sure you keep constant pressure on the rib as you wind if foward to help prevent the wing from shifting position.
At this point, it's pretty simple to finish off. Simply spiral the ribbing forward as you would on any fly. The only difference is when you cross the top of the fly, you need to part the hackle wing with a bodkin to make a slot for the rib. Be careful how you part the hackle wing, as you want the rib to naturally fall exactly where the hackles are parted, so it is binding down the stems only. This will keep the hackle barbs aligned naturally. Remember to maintain pressure on the rib at all times, just as you would using thread to tie down the wing.
Inspecting your work
When you reach the head, tie off the rib with tight thread wraps and inspect the wing one last time. At this point, you can't change much. It's possible a few hackle barbs have been trapped under the ribbing.
You can free these with your bodkin. Also, if parts of the wing have been pushed slightly to the far side of the body, you can pull them back into position if it's not too bad. If things are really messed up, your only option is to unwrap the rib and try again.
Once the wing is in place, all that remains is the hackle collar. Take another feather that is similar to those used in the wing and fold it. Tie it in by the tip where the ribbing was tied off and wrap it forward forming a full collar. Notice how the barbs continue to slant backwards and the longest barbs of the feather are in the front of the collar?
When I wrap a collar like this, I usually strip all the junk off the bottom of the feather and use the bare stem as a handle while wrapping. I then wrap until I reach bare stem. Tying off the hackle on the stem
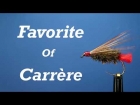
allows me to form a perfectly shaped head each and every time. A couple coats of head cement are all that is needed to finish the fly. If you've been careful, you're left with a very attractive fly that's every bit as effective on fish as it is pleasing to the eye. If you're adventurous, you can add a painted eye to the head. I rarely do, and haven't found it makes a tremendous difference to the fish. To the right you'll find a few of my favorite patterns.
You'll find that Matuka's lends themselves to realistic impressions as well as all sorts of attractor type color combinations.
Not much motion
Not only is the Matuka nice to look at, it fishes and casts very well. Since the wing of this fly is lashed to the body, there isn't a heck of a lot of built in motion, so it's up to the angler to make the fly appear alive. I've found it fishes best when cast down and across in a traditional streamer fashion, then stripped back with very short, quick, erratic strips, with most strikes coming between strips.
Read more about why you should register.


More content from the front page


Since you got this far …
The GFF money box
… I have a small favor to ask.
Long story short
Support the Global FlyFisher through several different channels, including PayPal.
Long story longer
The Global FlyFisher has been online since the mid-90's and has been free to access for everybody since day one – and will stay free for as long as I run it.
But that doesn't mean that it's free to run.
It costs money to drive a large site like this.
See more details about what you can do to help in this blog post.
Comments
Matuku, the New Zeal
Matuku, the New Zealand name the Australasian bittern .... is the species of birds whose feathers were used in the original pattern and the modern name Matuka of the fly is a contortion of this word
Excellent intro to t
Excellent intro to these flies. Those looking to delve deeper should check out Derek Quilliam's wonderful book The Complete Guide to New Zealand Trout Lures.
Comment on origin of matuka
Comment on origin of matuka. The name comes from new zealand where the first version of fly was tied using the feathers of the matuka bird (AKA as white faced heron, blue heron, blue crane) for the wings of the fly.
HI, can anyone there
HI, can anyone there tell me where and when the matuka originated or any of its history thank you