


The Sabot Fly
On the surface the job was simple, come up with some pike flies for my friend's teenage son's trip to Canada, something small enough that a teenager can handle and still tempt a pike.

"People say that there is a fly for every situation, but when you are flyfishing long enough you know that sometimes it's just not that simple. Particularly when you are flyfishing for pike, I can say that Bob's fly is the good choice. Nice, big, strong and shiny enough to get any pike's attention."
Tomaz Modic
Ljubljana, Slovenia
On the surface the job was simple, come up with some pike flies for my friend's teenage son's trip to Canada, something small enough that a teenager can handle and still tempt a pike.
Never seen one
Yeah, right! When it comes to pike my only experience was in books. Sheesh! I have never even seen a pike let alone catch one but
I did have the basic idea: "Think big, lots of teeth and aggressive.
Can't be that difficult for someone of my vast talents"... or so I thought.
I take off to the library (bathroom) loaded down with a good supply of catalogs to ponder the fate of the free World and try to come up with a solution to his problems. He was right, pike flies were certainly big and since I've never really tried pike flies on a tube this could be a fun change of pace.
The Criteria
After a few more library sessions I sort of laid out the criteria for such a fly:
- It had to appear big without actually being big.
- It shouldn't absorb water nor be difficult to lift out of the
water to cast.
- It should be colorful.
- It must be tough enough to resist a mouthful on chompers (teeth, lots of teeth)
- It should create a big fuss on the water.
And finally since pike are reported to be head bangers so the hook should be next to the head.
Airhead amok
By this time I lost count of my trips to the library loaded down with my priceless catalogs (damn lucky I have two such places in my house) but I envisioned a sort of slider constructed almost entirely of synthetic materials. For the head I'd go to a new concept I've been playing around, Airheads, a hollow affair made with braid and epoxy, sort of a popper turned around backwards. Off to my tying room, congratulating myself on my brilliance I started to whip one together and ended up with one giant glued up mess (no, if I go to the library this time it'll be to throw up). Clearly somewhere between conception and final product something went amok.
While reading about "airheads" I must have missed something important but being hardheaded I again tried again till I finally fumbled my way to a workable process to construct this fly.
Happy camper
Finishing the flies I gave them to my friend's son and off he went to Ontario, Canada catching some nice pike on them and was a happy camper, my friend thought me a genius not knowing the pile of stuff which filled my trash can from failed attempts. I also have a friend from Slovenia who begged and pleaded for some in red and white so to keep him happy I did him some too. Same results, so maybe what they say about all those trips to the library is true, "The best ideas are hatched in solitude". OK, OK, enough of this jocularity, here's how you make a "Sabot". Oh yeah, why the name "Sabot"? A sabot is a solid projectile used to punch it's way through the side of tanks, you'll understand the reasoning behind the name if this thing wacks you on the head.
Tying a Sabot
Stuff you're going to need:
(1) Some plastic tubing, I use Kennebec River's "Freshwater Tubes"
(2) Clear Nylon sewing thread, the only thread to use under epoxy
(3) Some sort of artificial winging material for the tail, choice of color is yours but I've found Gordon Griffiths "Pearly" works best, comes in many colors with highlights of sparkles, and can be brushed out to create a hair like appearance.
(4) Some hackle, Chinese necks in a color of your choice
(5) Some hollow braided body material about 1/4 inch diameter. Now this part can be tricky as not all body material is suitable for making "airheads". What I've found best is a flexible, expandable material with some metal component to the braid, I wouldn't worry about color too much but it's best to stay with silver or pearl. Those braids made entirely of heavy plastic are worthless as they totally unravel when you are trying to turn the braid inside out.
(6) Epoxy, slow and fast drying, Devcon again is my choice but remember this, use only metal tools and do not mix on colored paper as the epoxy will darken, plastic, glass or aluminum foil is best.
(7) And finally something to color the head, my choice and only choice is acrylic artists paint.
Step 1

Picture 1: Tube and hook holder.
Cut a piece of tubing about 2-1/2 inches long, heat the end to form a knot and tie on a hook holder, since you'll be using a big hook you may have to double up the big holder with a small one underneath . Wrap the holder with the clear nylon sewing thread and epoxy the windings and let dry.
Step2
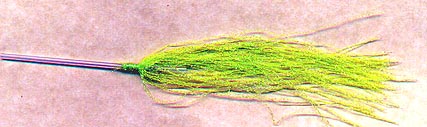
Picture 2: Winging
Tie in a nice clump of winging material evenly around the tube and right next to the hook holder.
Step 3
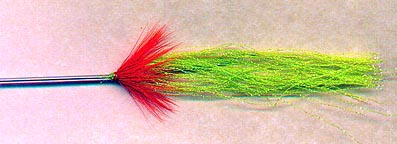
Picture 3: Hackle
Add the hackle, use two pieces of a long flued feather, tie in by the tips and fold the feather while winding to produce a nice thick collar. Tie off and epoxy the windings.
Step 4

Picture 4: Controlling the wing
With thread tie down the collar and make several ties along the wing. This is an important step as the feather and wing seems to find its way into the epoxy while drying.
Ok, let's take a break, time for some coffee... So far this fly is really nothing special, a common pike pattern used everywhere. You actually could make any style head either solid epoxy, wood or foam but what separates mine from others is the fact my head is hollow epoxy so if your break is done it's time to make the head.
Step 5

Picture 5: Braided tubing
Take some of the braided material and push it up the tube so the braid covers the collar, push it along the tube and tie it down right next to the previous windings. Don't be afraid to use too long a piece of braid as this stuff has a nasty habit of unraveling some. The more stiff
plastic in the braid the worse the unraveling. Epoxy the windings to form a water seal between the braid and tube, let dry thoroughly.
Step 6
Picture 6: Turning braid inside out
Right! Now the tricky stuff, basically we're going to turn the braid inside out and form the head, easier said than done. Take your fingers and gently grasp around the braid and pull forward on the fly, rolling the braid inside out. It'll probably take a couple of times to completely get the material completely turned around.
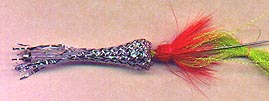
Step 7

Picture 7: Tying down the braid
Push the braid to the rear and it'll form a cup which will cover all the windings (sort of a backwards popper) , tie down the nose of the head and whip finish, trim off the excess braid material. Congratulations! You've made an "Airhead"
Step 8

Picture 8: Ready for epoxy
Since the braid is secured now you can move it without fear of unraveling which is exactly what we're going to do and fill in the braid gaps to make it waterproof. Push the braid forward gently to expose the area in the cupped portion of the head, generally it'll stay that way until pushed back. You're only going to get one shot at this so be careful. Mix some 5-minute epoxy and apply it to the cup area filling all the holes in the braid. This is tricky because some of the holes will reappear so you'll have to keep at it before the epoxy becomes too stiff to apply. Once you think you have it push the head back into shape till it looks like Picture 7.Mix some more epoxy and cover the rest of the head, let dry.
Coloring the head
I really like to use acrylic artists paints here but certainly you could use other mediums but some of these have a nasty smell and I'm not too sure they're not all that good for the lungs.
Painting directly on the head is one option, this giving sort of a translucent look but my favorite method is blending the acrylic paint directly with a slow drying epoxy. First mix your colors to obtain the desired shade, on a separate piece of aluminum foil mix up some epoxy.
Slowly mix the acrylic paint in small amounts into the epoxy until you have the amount you think is the proper shade, apply to the head while turning the fly in the vise and quickly place in a dryer so it turns slowly. Note: If the epoxy doesn't completely dry cover it with a layer of "Sally Hensons Hard As Nails". Glue on some dolls eyes and cover the head with another coat of epoxy, let dry and trim off the excess tube.
Different it is
That's it, you have one very tough slider, as far as original, it's not, but different it is. You can make the whole thing bigger, use a rabbit strip or some hair for the wing. I'm sure someone else will come up with some other "Airhead" patterns but I hope you got some inspiration from my efforts. Poppers are also fun and really not that much different than a slider, actually a lot easier.
Good Luck.
Read more about why you should register.
Related content


More content from the front page


  |
 |
 |
 |
 |
 |


Since you got this far …
The GFF money box
… I have a small favor to ask.
Long story short
Support the Global FlyFisher through several different channels, including PayPal.
Long story longer
The Global FlyFisher has been online since the mid-90's and has been free to access for everybody since day one – and will stay free for as long as I run it.
But that doesn't mean that it's free to run.
It costs money to drive a large site like this.
See more details about what you can do to help in this blog post.
Comments
Neat fly. Hate to ni
Neat fly. Hate to nitpick, but sabot is dutch for "shoe", and describes the packing around a solid sabot round. They use 'em to fire rifle bullets from black powder rifles, too.